This is a short tutorial on how to check if mysql binary log is enabled and activate it, if it is not.
The tutorial is intended for percona replication cluster (on activation part) but the commands to check for status can be used on any version:
- login to mysql console
- run below query to see if binary logs are active:
mysql> show binary logs;
+------------------+------------+
| Log_name | File_size |
+------------------+------------+
| mysql-bin.000004 | 1073742107 |
| mysql-bin.000005 | 185647657 |
+------------------+------------+
2 rows in set (0.00 sec) - run below command to see for how many retention days this is setup to:
mysql> show variables like "%expire%";
+--------------------------------+-------+
| Variable_name | Value |
+--------------------------------+-------+
| disconnect_on_expired_password | ON |
| expire_logs_days | 3 |
+--------------------------------+-------+
2 rows in set (0.00 sec)
In this case the retention is set to 3 days. - you need it setup, please use below steps to activate it:
Requirements: percona servers should be added to the "Cluster Control" for ease of management
So the tutorial will focus on adding the server to the cluster control as well and configuring the binary logs along.
Requirements for the Master Cluster
There are some requirements for the Master Cluster to make it work:
- Percona XtraDB Cluster version 5.6.x and later, or MariaDB Galera Cluster version 10.x and later.
- GTID enabled.
- Binary Logging enabled on at least one database node.
- The backup credentials must be the same across the Master Cluster and Slave Cluster.
Preparing the Master Cluster
The Master Cluster needs to be prepared to use this new feature. It requires configuration from both ClusterControl and Database side.
ClusterControl Configuration
In the database node, check the backup user credentials stored in /etc/my.cnf.d/secrets-backup.cnf (For RedHat Based OS) or in /etc/mysql/secrets-backup.cnf (For Debian Based OS).
$ cat /etc/my.cnf.d/secrets-backup.cnf
# Security credentials for backup.
[mysqldump]
user=backupuser
password=cYj0GFBEdqdreZEl
[xtrabackup]
user=backupuser
password=cYj0GFBEdqdreZEl
[mysqld]
wsrep_sst_auth=backupuser:cYj0GFBEdqdreZEl
In the ClusterControl node, edit the /etc/cmon.d/cmon_ID.cnf configuration file (where ID is the Cluster ID Number) and make sure it contains the same credentials stored in secrets-backup.cnf.
$ cat /etc/cmon.d/cmon_8.cnf
backup_user=backupuser
backup_user_password=cYj0GFBEdqdreZEl
basedir=/usr
cdt_path=/
cluster_id=8

Any change on this file requires a cmon service restart:
$ service cmon restartCheck the database replication parameters to make sure that you have GTID and Binary Logging enabled.
Database Configuration
In the database node, check the file /etc/my.cnf (For RedHat Based OS) or /etc/mysql/my.cnf (For Debian Based OS) to see the configuration related to the replication process.
Percona XtraDB:
$ cat /etc/my.cnf

# REPLICATION SPECIFIC

server_id=4002

binlog_format=ROW

log_bin = /var/lib/mysql-binlog/binlog

log_slave_updates = ON

gtid_mode = ON

enforce_gtid_consistency = true

relay_log = relay-log

expire_logs_days = 7
MariaDB Galera Cluster:
$ cat /etc/my.cnf
# REPLICATION SPECIFIC
server_id=9000
binlog_format=ROW
log_bin = /var/lib/mysql-binlog/binlog
log_slave_updates = ON
relay_log = relay-log
wsrep_gtid_domain_id=9000
wsrep_gtid_mode=ON
gtid_domain_id=9000
gtid_strict_mode=ON
gtid_ignore_duplicates=ON
expire_logs_days = 7
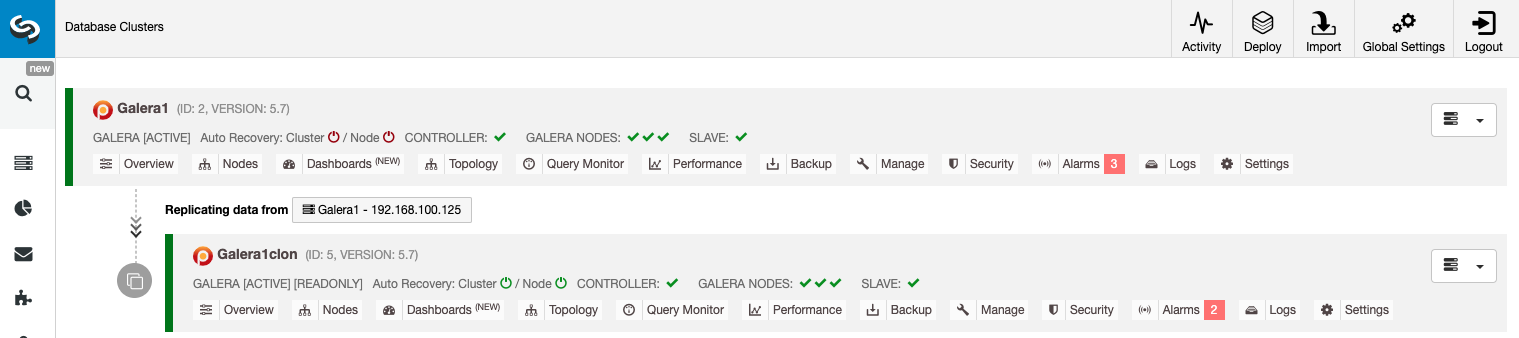
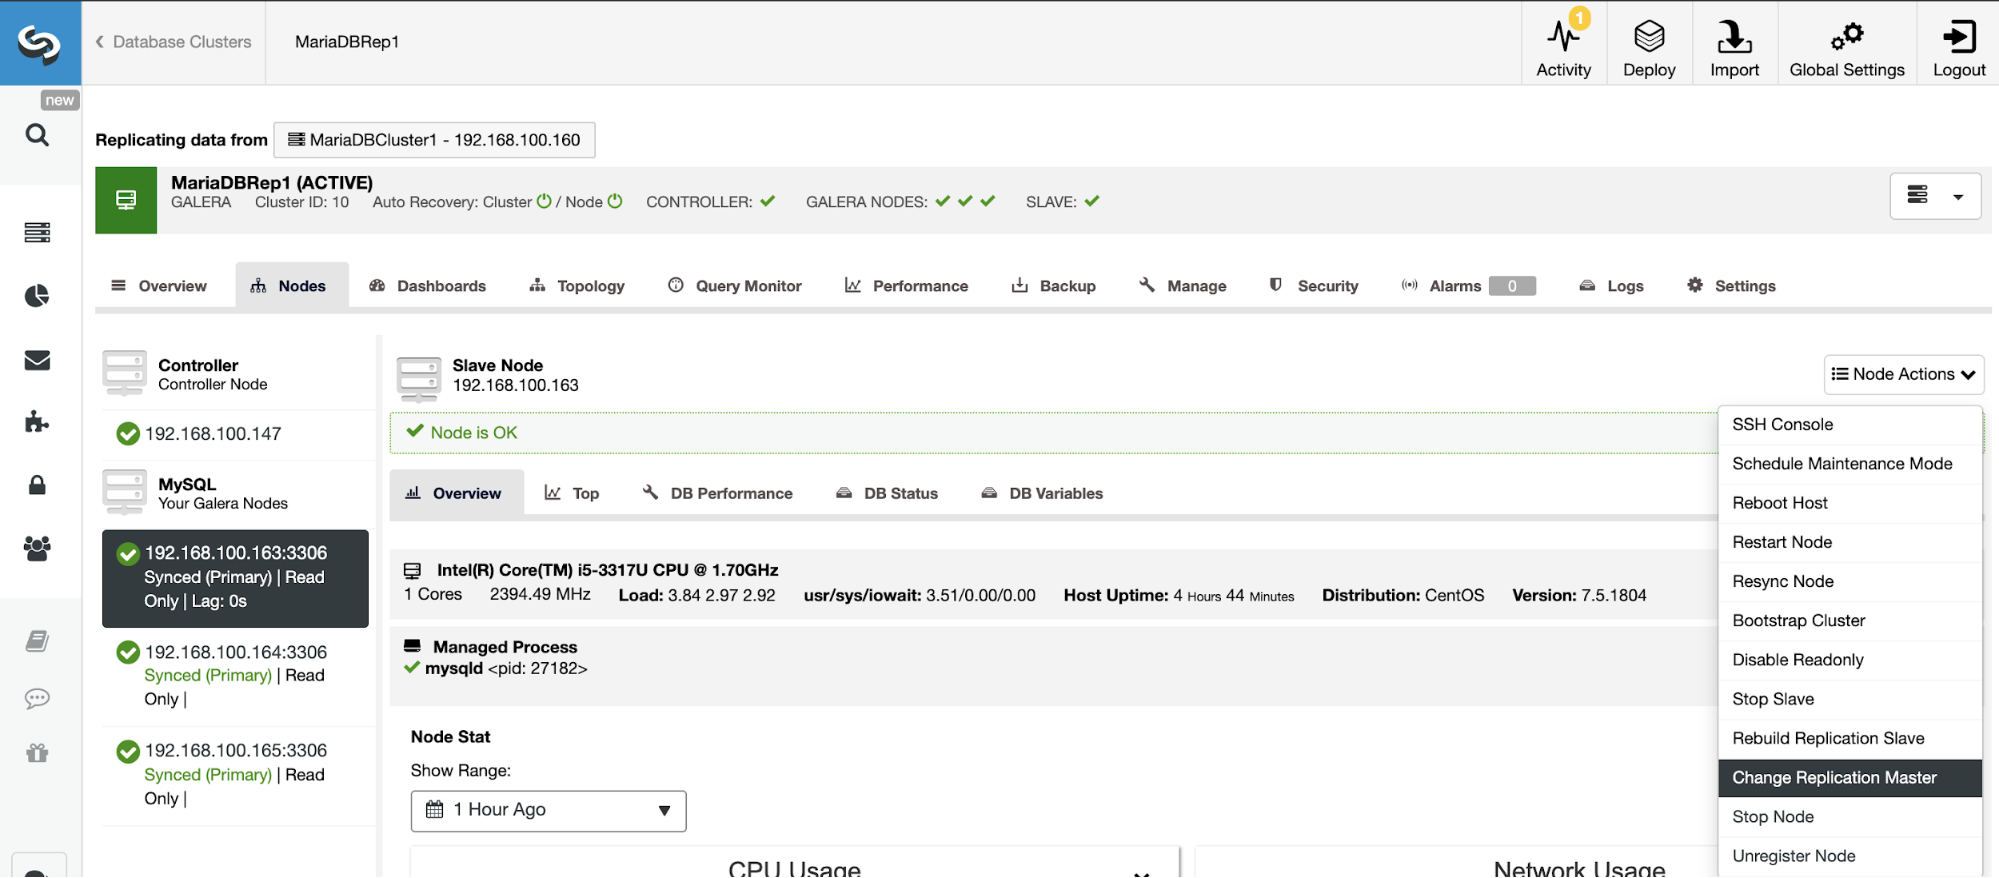
Insted checking the configuration files, you can verify if it’s enabled in the ClusterControl UI. Go to ClusterControl -> Select Cluster -> Nodes. There you should have something like this:
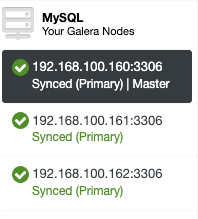
The “Master” role added in the first node means that the Binary Logging is enabled.
Enabling Binary Logging
If you don’t have the binary logging enabled, go to ClusterControl -> Select Cluster -> Nodes -> Node Actions -> Enable Binary Logging.

Then, you must specify the binary log retention, and the path to store it. You should also specify if you want ClusterControl to restart the database node after configuring it, or if you prefer to restart it by yourself.
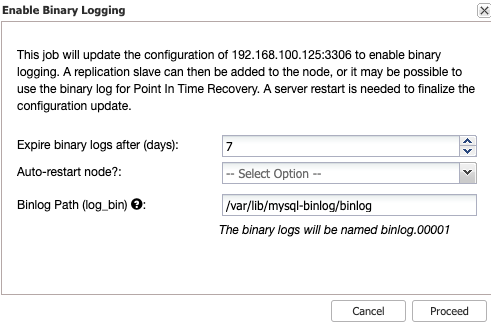
Keep in mind that Enabling Binary Logging always requires a restart of the database service.
Creating the Slave Cluster from the ClusterControl GUI
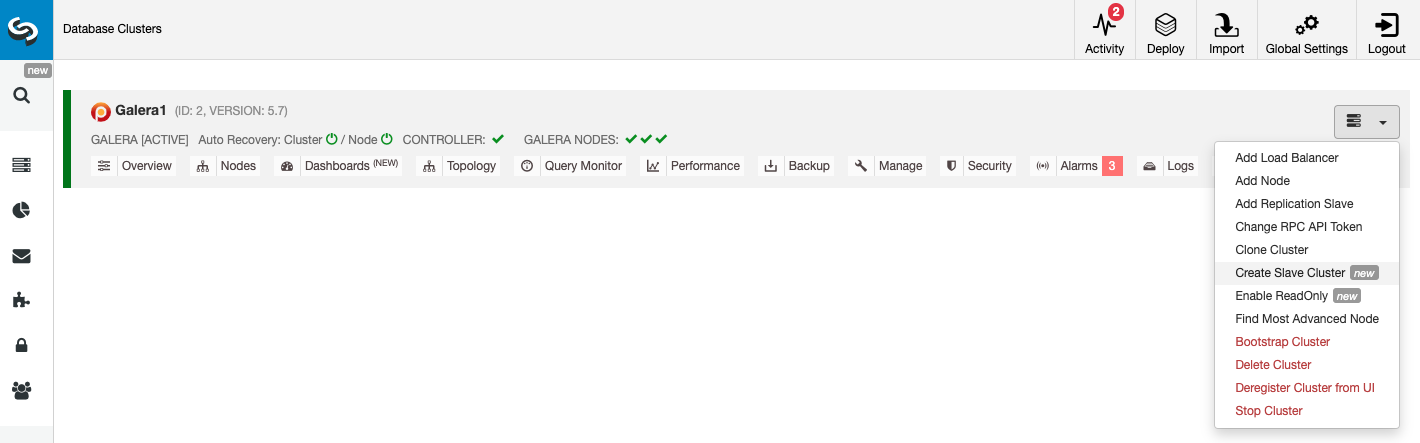
To create a new Slave Cluster, go to ClusterControl -> Select Cluster -> Cluster Actions -> Create Slave Cluster.
The Slave Cluster can be created by streaming data from the current Master Cluster or by using an existing backup.
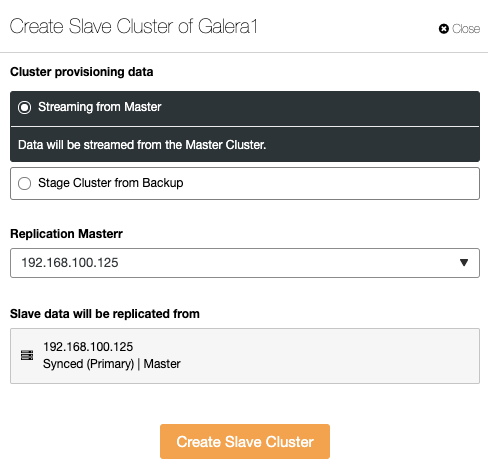
In this section, you must also choose the master node of the current cluster from which the data will be replicated.
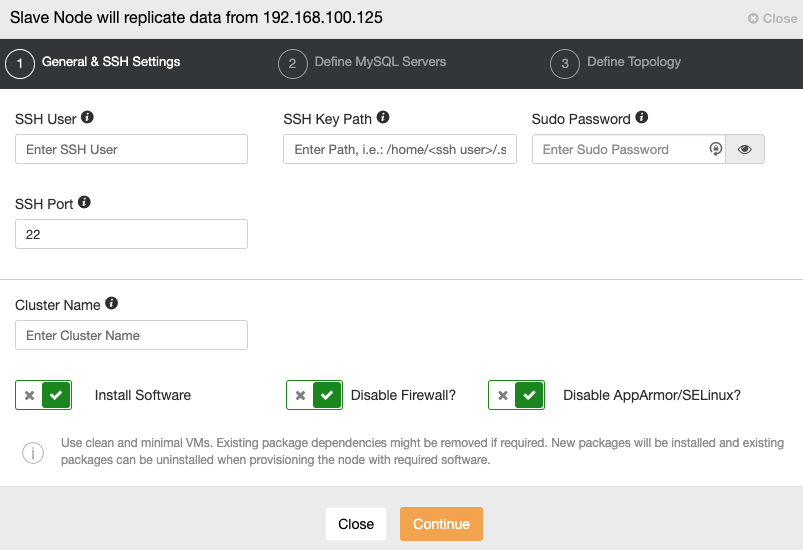
When you go to the next step, you must specify User, Key or Password and port to connect by SSH to your servers. You also need a name for your Slave Cluster and if you want ClusterControl to install the corresponding software and configurations for you.
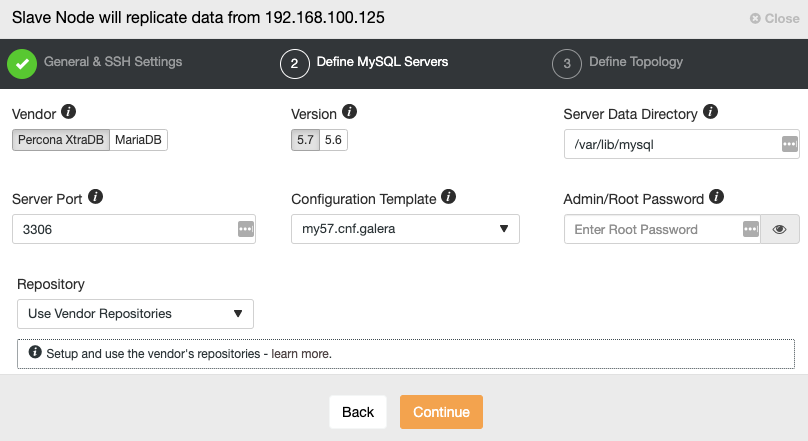
After setting up the SSH access information, you must define the database vendor and version, datadir, database port, and the admin password. Make sure you use the same vendor/version and credentials as used by the Master Cluster. You can also specify which repository to use.
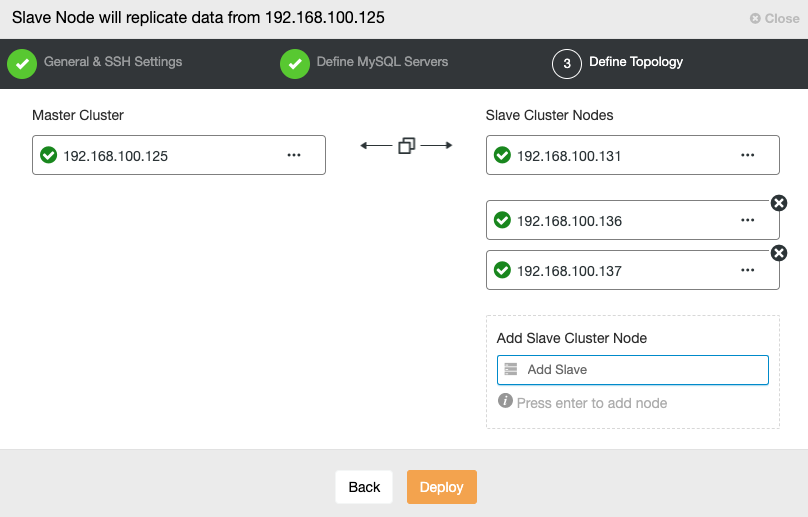
In this step, you need to add servers to the new Slave Cluster. For this task, you can enter both IP Address or Hostname of each database node.
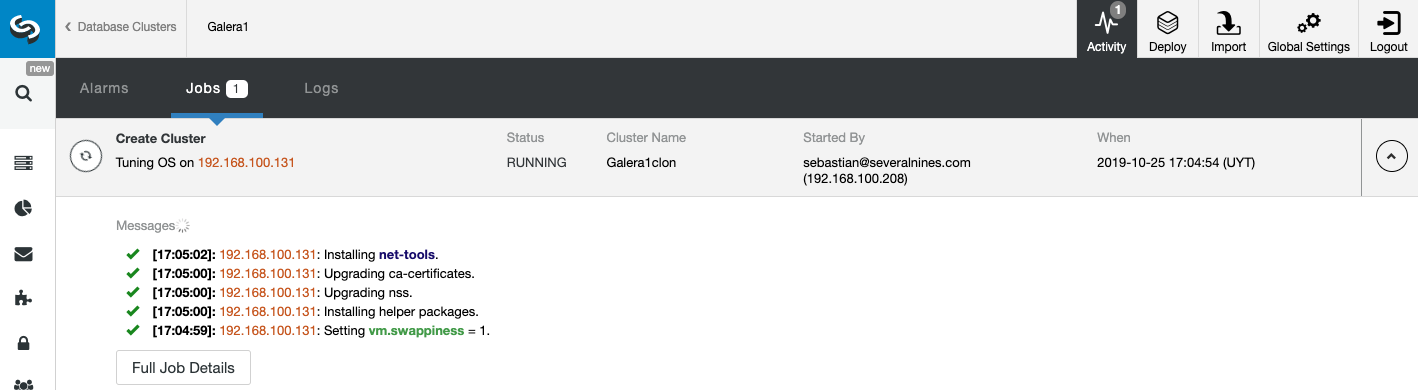
You can monitor the status of the creation of your new Slave Cluster from the ClusterControl activity monitor. Once the task is finished, you can see the cluster in the main ClusterControl screen.
Managing Cluster-to-Cluster Replication Using the ClusterControl GUI
Now you have your Cluster-to-Cluster Replication up and running, there are different actions to perform on this topology using ClusterControl.
Configure Active-Active Clusters
As you can see, by default the Slave Cluster is set up in Read-Only mode. It’s possible to disable the Read-Only flag on the nodes one by one from the ClusterControl UI, but keep in mind that Active-Active clustering is only recommended if applications are only touching disjoint data sets on either cluster since MySQL/MariaDB doesn’t offer any Conflict Detection or Resolution.
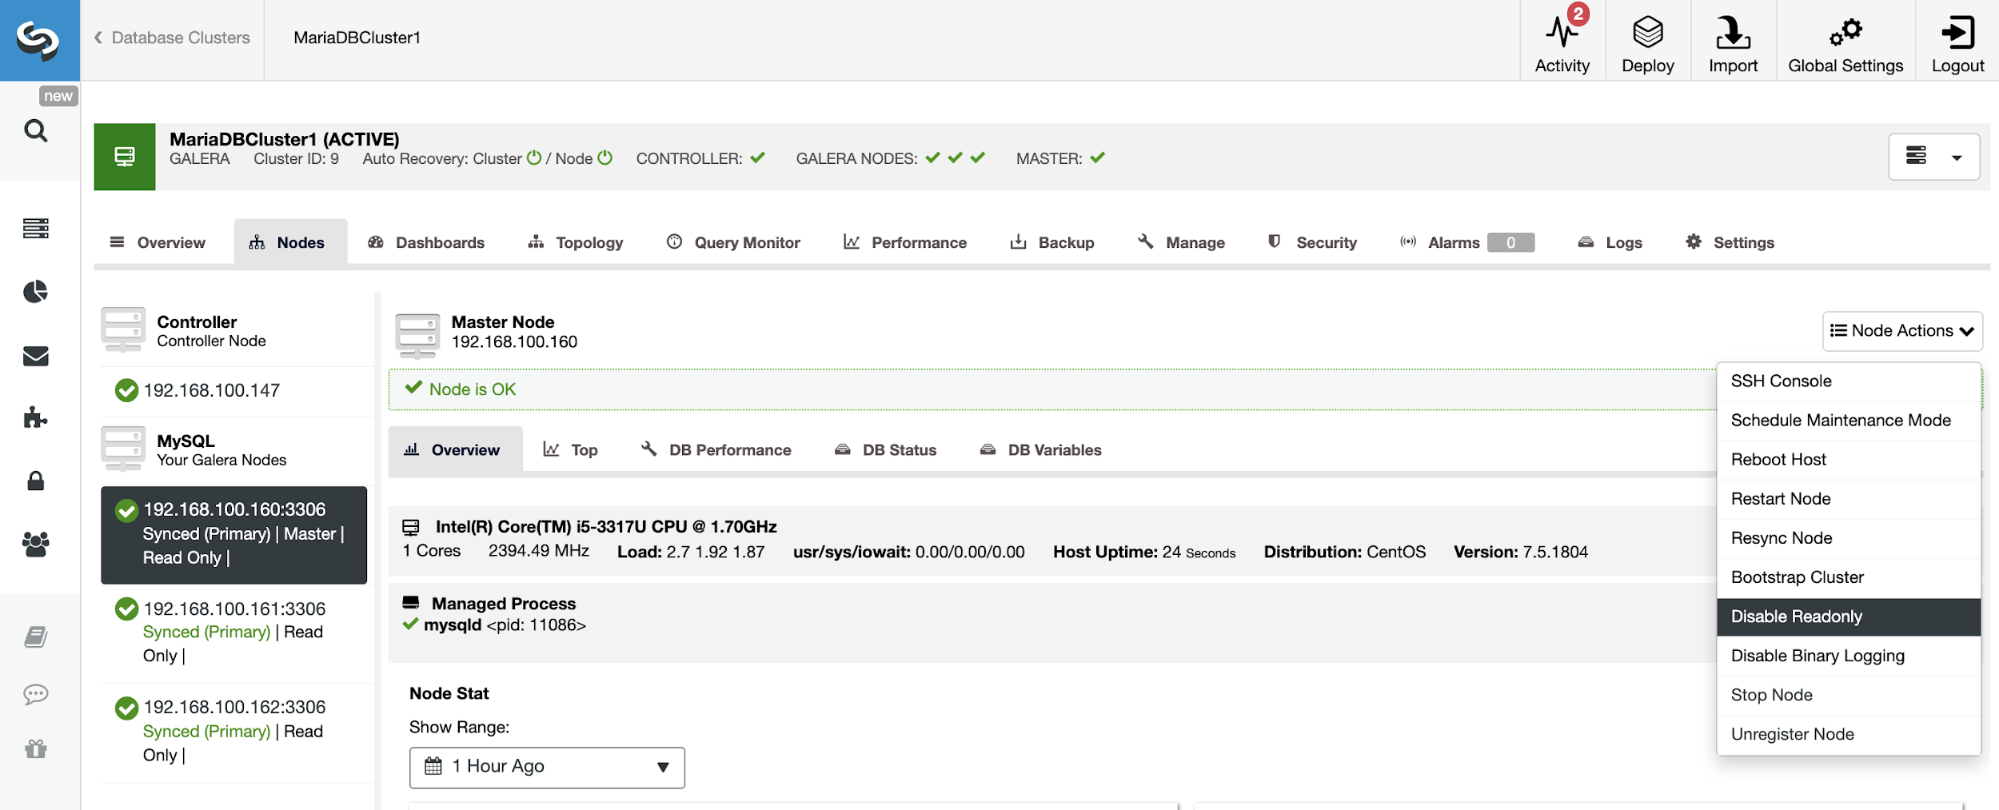
To disable the Read-Only mode, go to ClusterControl -> Select Slave Cluster -> Nodes. In this section, select each node and use the Disable Read-Only option.
Rebuilding a Slave Cluster
To avoid inconsistencies, if you want to rebuild a Slave Cluster, this must be a Read-Only cluster, this means that all nodes must be in Read-Only mode.
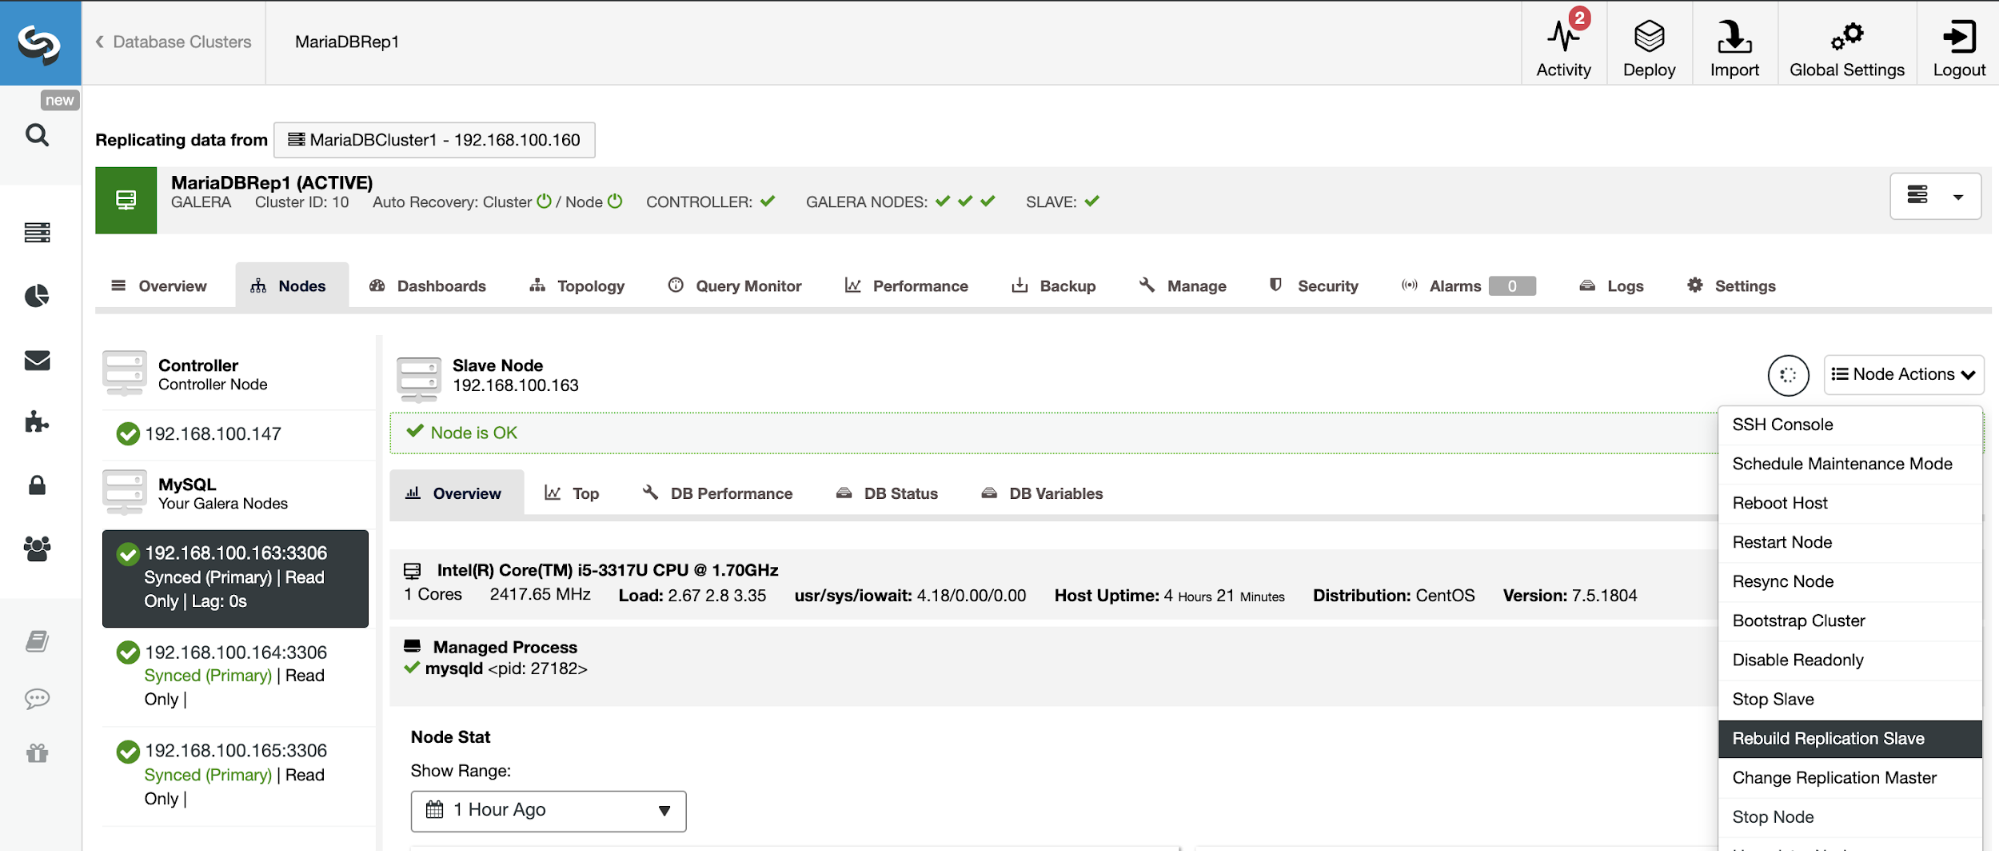
Go to ClusterControl -> Select Slave Cluster -> Nodes -> Choose the Node connected to the Master Cluster -> Node Actions -> Rebuild Replication Slave.
Topology Changes
If you have the following topology:
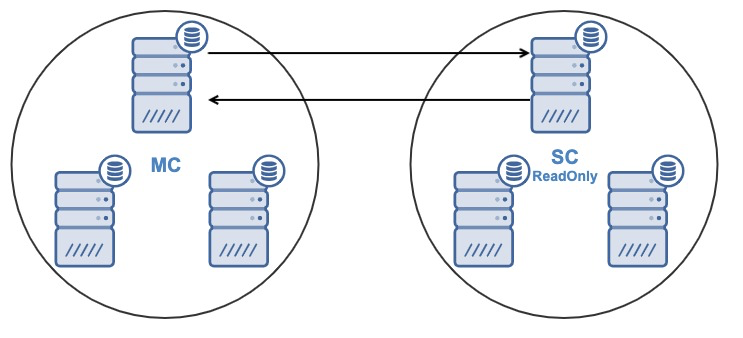
And for some reason, you want to change the replication node in the Master Cluster. It’s possible to change the master node used by the Slave Cluster to another master node in the Master Cluster.
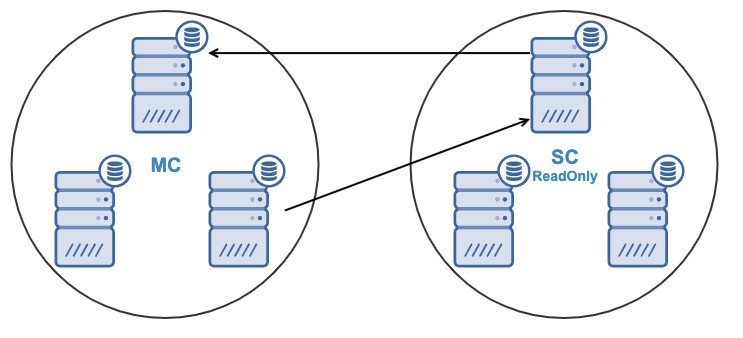
To be considered as a master node, it must have the binary logging enabled.
Go to ClusterControl -> Select Slave Cluster -> Nodes -> Choose the Node connected to the Master Cluster -> Node Actions -> Stop Slave/Start Slave.
Stop/Start Replication Slave
You can stop and start replication slaves in an easy way using ClusterControl.
Go to ClusterControl -> Select Slave Cluster -> Nodes -> Choose the Node connected to the Master Cluster -> Node Actions -> Stop Slave/Start Slave.
Reset Replication Slave
Using this action, you can reset the replication process using RESET SLAVE or RESET SLAVE ALL. The difference between them is, RESET SLAVE doesn’t change any replication parameter like master host, port and credentials. To delete this information you must use RESET SLAVE ALL that removes all the replication configuration, so using this command the Cluster-to-Cluster Replication link will be destroyed.
Before using this feature, you must stop the replication process (please refer to the previous feature).
Go to ClusterControl -> Select Slave Cluster -> Nodes -> Choose the Node connected to the Master Cluster -> Node Actions -> Reset Slave/Reset Slave All.
Managing Cluster-to-Cluster Replication Using the ClusterControl CLI
In the previous section, you were able to see how to manage a Cluster-to-Cluster Replication using the ClusterControl UI. Now, let’s see how to do it by using the command line.
Note: As we mentioned at the beginning of this blog, we will assume you have ClusterControl installed and the Master Cluster was deployed using it.
Create the Slave Cluster
First, let’s see an example command to create a Slave Cluster by using the ClusterControl CLI:
s9s cluster --create --cluster-name=Galera1rep --cluster-type=galera --provider-version=10.4 --nodes="192.168.100.166;192.168.100.167;192.168.100.168" --os-user=root --os-key-file=/root/.ssh/id_rsa --db-admin=root --db-admin-passwd=xxxxxxxx --vendor=mariadb --remote-cluster-id=11 --logNow you have your create slave process running, let’s see each used parameter:
- Cluster: To list and manipulate clusters.
- Create: Create and install a new cluster.
- Cluster-name: The name of the new Slave Cluster.
- Cluster-type: The type of cluster to install.
- Provider-version: The software version.
- Nodes: List of the new nodes in the Slave Cluster.
- Os-user: The user name for the SSH commands.
- Os-key-file: The key file to use for SSH connection.
- Db-admin: The database admin user name.
- Db-admin-passwd: The password for the database admin.
- Remote-cluster-id: Master Cluster ID for the Cluster-to-Cluster Replication.
- Log: Wait and monitor job messages.
Using the --log flag, you will be able to see the logs in real time:
Verifying job parameters.
Checking ssh/sudo on 3 hosts.
All 3 hosts are accessible by SSH.
192.168.100.166: Checking if host already exists in another cluster.
192.168.100.167: Checking if host already exists in another cluster.
192.168.100.168: Checking if host already exists in another cluster.
192.168.100.157:3306: Binary logging is enabled.
192.168.100.158:3306: Binary logging is enabled.
Creating the cluster with the following:
wsrep_cluster_address = 'gcomm://192.168.100.166,192.168.100.167,192.168.100.168'
Calling job: setupServer(192.168.100.166).
192.168.100.166: Checking OS information.
Caching config files.

Job finished, all the nodes have been added successfully.
Configure Active-Active Clusters
As you could see earlier, you can disable the Read-Only mode in the new cluster by disabling it in each node, so let’s see how to do it from the command line.
$ s9s node --set-read-write --nodes="192.168.100.166" --cluster-id=16 --log
Node: To handle nodes.Let’s see each parameter:- Set-read-write: Set the node to Read-Write mode.
- Nodes: The node where to change it.
- Cluster-id: The ID of the cluster in which the node is.
Then, you will see:
192.168.100.166:3306: Setting read_only=OFF.
You can rebuild a Slave Cluster using the following command:Rebuilding a Slave Cluster
$ s9s replication --stage --master="192.168.100.157:3306" --slave="192.168.100.166:3306" --cluster-id=19 --remote-cluster-id=11 --log
Replication: To monitor and control data replication.The parameters are:- Stage: Stage/Rebuild a Replication Slave.
- Master: The replication master in the master cluster.
- Slave: The replication slave in the slave cluster.
- Cluster-id: The Slave Cluster ID.
- Remote-cluster-id: The Master Cluster ID.
- Log: Wait and monitor job messages.
The job log should be similar to this one:
Rebuild replication slave 192.168.100.166:3306 from master 192.168.100.157:3306.
Remote cluster id = 11
Shutting down Galera Cluster.
192.168.100.166:3306: Stopping node.
192.168.100.166:3306: Stopping mysqld (timeout=60, force stop after timeout=true).
192.168.100.166: Stopping MySQL service.
192.168.100.166: All processes stopped.
192.168.100.166:3306: Stopped node.
192.168.100.167:3306: Stopping node.
192.168.100.167:3306: Stopping mysqld (timeout=60, force stop after timeout=true).
192.168.100.167: Stopping MySQL service.
192.168.100.167: All processes stopped.
192.168.100.157:3306: Changing master to 192.168.100.166:3306.
192.168.100.157:3306: Changed master to 192.168.100.166:3306
192.168.100.157:3306: Starting slave.
192.168.100.157:3306: Collecting replication statistics.
192.168.100.157:3306: Started slave successfully.
192.168.100.166:3306: Starting node
Writing file '192.168.100.167:/etc/mysql/my.cnf'.
Writing file '192.168.100.167:/etc/mysql/secrets-backup.cnf'.
Writing file '192.168.100.168:/etc/mysql/my.cnf'.
You can change your topology using another node in the Master Cluster from which replicate the data, so for example, you can run:Topology Changes
s9s replication --failover --master="192.168.100.161:3306" --slave="192.168.100.163:3306" --cluster-id=10 --remote-cluster-id=9 --log
Let’s check the used parameters.- Replication: To monitor and control data replication.
- Failover: Take the role of master from a failed/old master.
- Master: The new replication master in the Master Cluster.
- Slave: The replication slave in the Slave Cluster.
- Cluster-id: The ID of the Slave Cluster.
- Remote-Cluster-id: The ID of the Master Cluster.
- Log: Wait and monitor job messages.
You will see this log:
192.168.100.161:3306 belongs to cluster id 9.
192.168.100.163:3306: Changing master to 192.168.100.161:3306
192.168.100.163:3306: My master is 192.168.100.160:3306.
192.168.100.161:3306: Sanity checking replication master '192.168.100.161:3306[cid:9]' to be used by '192.168.100.163[cid:139814070386698]'.
192.168.100.161:3306: Executing GRANT REPLICATION SLAVE ON *.* TO 'cmon_replication'@'192.168.100.163'.
Setting up link between  192.168.100.161:3306 and 192.168.100.163:3306
192.168.100.163:3306: Stopping slave.
192.168.100.163:3306: Successfully stopped slave.
192.168.100.163:3306: Setting up replication using MariaDB GTID: 192.168.100.161:3306->192.168.100.163:3306.
192.168.100.163:3306: Changing Master using master_use_gtid=slave_pos.
192.168.100.163:3306: Changing master to 192.168.100.161:3306.
192.168.100.163:3306: Changed master to 192.168.100.161:3306
192.168.100.163:3306: Starting slave.
192.168.100.163:3306: Collecting replication statistics.
192.168.100.163:3306: Started slave successfully.
192.168.100.160:3306: Flushing logs to update 'SHOW SLAVE HOSTS'
You can stop to replicate the data from the Master Cluster in this way: Stop/Start Replication Slave
s9s replication --stop --slave="192.168.100.166:3306" --cluster-id=19 --log
192.168.100.166:3306: Ensuring the datadir '/var/lib/mysql' exists and is owned by 'mysql'.You will see this:192.168.100.166:3306: Stopping slave.
192.168.100.166:3306: Successfully stopped slave.
And now, you can start it again:s9s replication --start --slave="192.168.100.166:3306" --cluster-id=19 --log
So, you will see:192.168.100.166:3306: Ensuring the datadir '/var/lib/mysql' exists and is owned by 'mysql'.
192.168.100.166:3306: Starting slave.
192.168.100.166:3306: Collecting replication statistics.
192.168.100.166:3306: Started slave successfully.
Replication: To monitor and control data replication.Now, let’s check the used parameters.- Stop/Start: To make the slave stop/start replicating.
- Slave: The replication slave node.
- Cluster-id: The ID of the cluster in which the slave node is.
- Log: Wait and monitor job messages.
Reset Replication Slave
Using this command, you can reset the replication process using RESET SLAVE or RESET SLAVE ALL. For more information about this command, please check the usage of this in the previous ClusterControl UI section.
Before using this feature, you must stop the replication process (please refer to the previous command).
RESET SLAVE:
$ s9s replication --reset --slave="192.168.100.166:3306" --cluster-id=19 --log
The log should be like:

192.168.100.166:3306: Ensuring the datadir '/var/lib/mysql' exists and is owned by 'mysql'.

192.168.100.166:3306: Executing 'RESET SLAVE'.

192.168.100.166:3306: Command 'RESET SLAVE' succeeded.
RESET SLAVE ALL:
$ s9s replication --reset --force --slave="192.168.100.166:3306" --cluster-id=19 --log
And this log should be:
192.168.100.166:3306: Ensuring the datadir '/var/lib/mysql' exists and is owned by 'mysql'.And this log should be:
192.168.100.166:3306: Executing 'RESET SLAVE /*!50500 ALL */'.

192.168.100.166:3306: Command 'RESET SLAVE /*!50500 ALL */' succeeded.

Replication: To monitor and control data replication.Let’s see the used parameters for both RESET SLAVE and RESET SLAVE ALL.- Reset: Reset the slave node.
- Force: Using this flag you will use the RESET SLAVE ALL command on the slave node.
- Slave: The replication slave node.
- Cluster-id: The Slave Cluster ID.
- Log: Wait and monitor job messages.
Conclusion
This new ClusterControl feature will allow you to create Cluster-to-Cluster Replication fast and manage it in an easy and friendly way. This environment will improve your database/cluster topology and it would be useful for a Disaster Recovery Plan, testing environment and even more options mentioned in the overview blog.
Previous blog
An Overview of Cluster-to-Cluster Replication