WireGuard has been causing quite a stir in networking over the last year or so, promising an easier way to manage VPN connections, and has some interesting benefits from my point of view.
Note: All keys used shown in the screenshots are no longer in use and were created solely for the purposes of this post, no need to warn me, or try them out, I guarantee they've been nuked from orbit.
Firstly, it doesn't drain my battery like OpenVPN on my phone, opening up the possibility to leave it connected for much longer periods.
Secondly, I have Adguard installed on a Pi on my LAN, so by using that as my DNS when connected to WireGuard, I get ad blocking when I'm out and about.
Thirdly I often have to connect to a public WiFi access point at work, yeah, yeah, I know, it's difficult to believe in this day and age that I don't have access to a staff designated WiFi network, but it is what it is. I do however have occasion to use my laptop at work, and it would be useful to be able to access my LAN and my ever growing pool of services, and quite frankly, I don't want my traffic visible to all and sundry whilst I'm doing so, I previously used OpenVPN for this, but WireGuard is somewhat lighter on resources, so I decided to migrate.
OPNSense
For a long time I have been using PFsense, however, they don't seem to have any impending plans to implement WireGuard, and the interface of OPNsense is prettier to my eye, so being the sucker to eye candy that I am, and keen to try out WireGuard, I decided to migrate. Long story short, it's not difficult to migrate, but you can't import your PFsense configuration directly into OPNsense, so I used a multistep approach.
- Virtualised my current PFsense instance
- Wiped my bare metal PFsense instance and installed OPNsense
- Manually migrated my PFsense configuration to OPNsense on bare metal.
The advantage of this was there was little risk of me leaving the family without a working internet connection and incurring the wrath of the wife, and it actually worked out so well, I've kept both the virtualised PFsense instance and also created a backup OPNsense virtual machine, which can utilise a backup of my settings from the bare metal install should I ever need to do so.
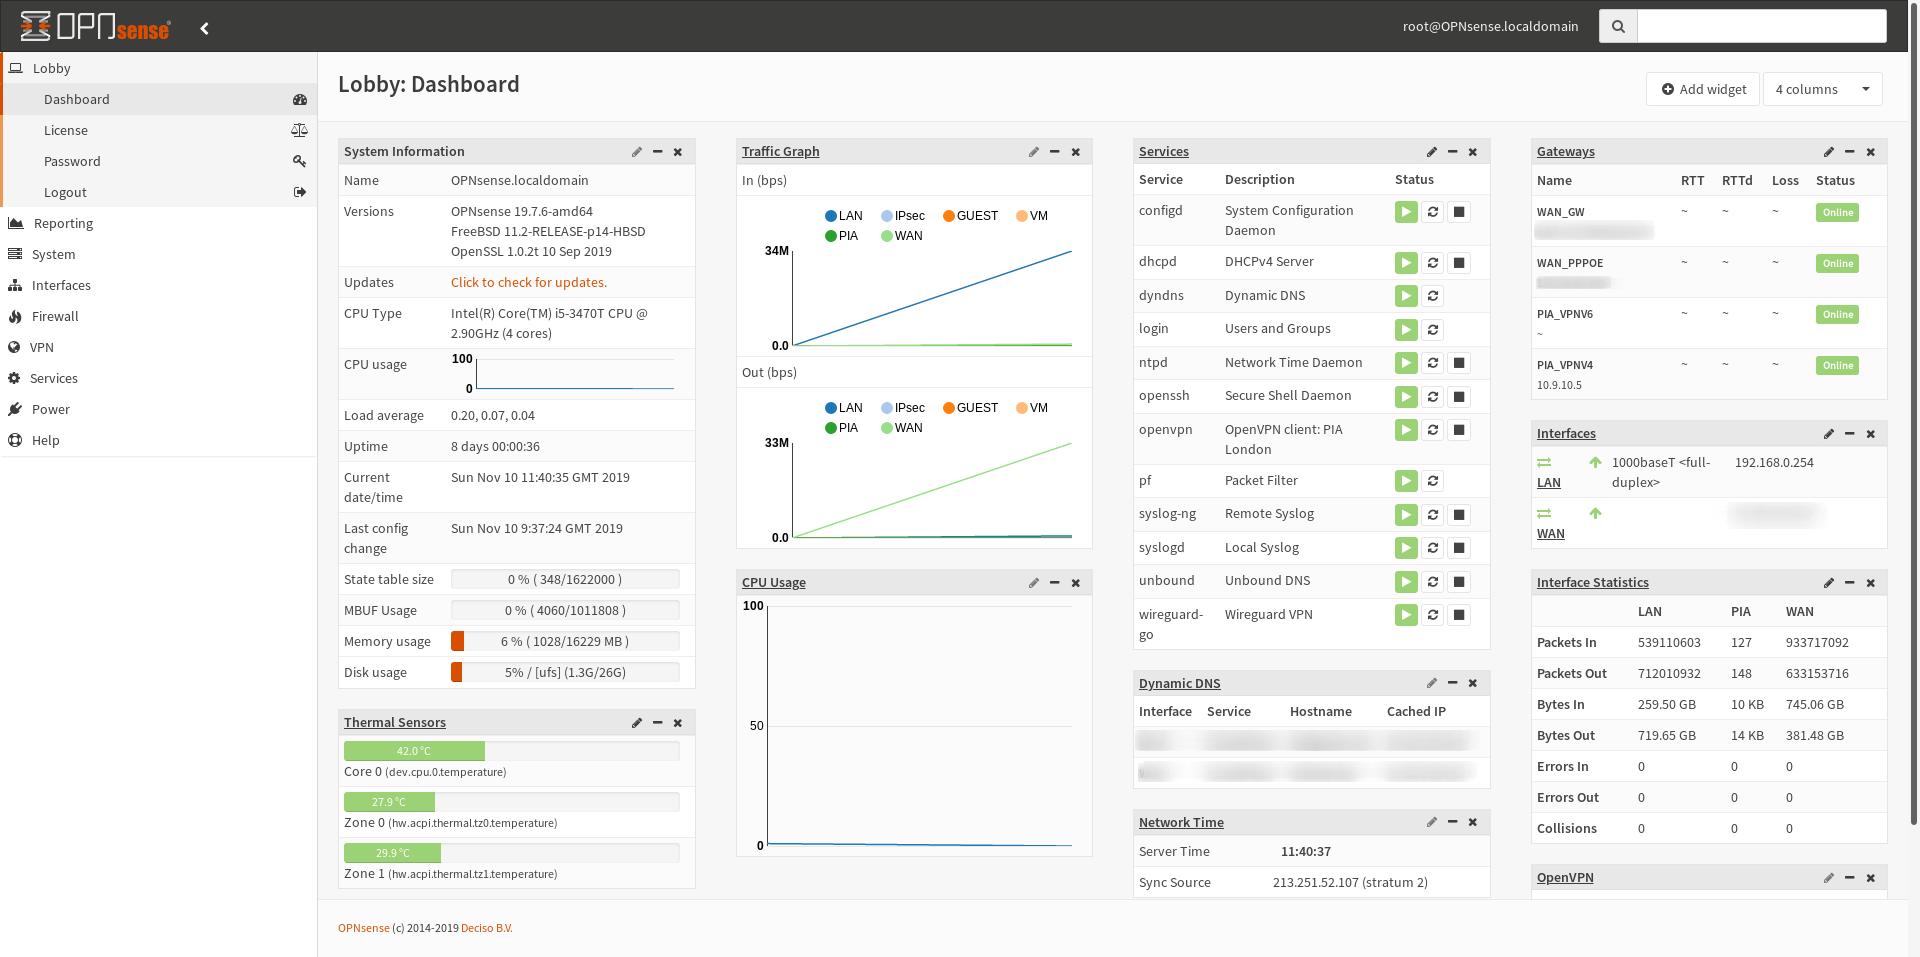
I'm not going to discuss the relative merits of one vs the other, as it's an emotive issue, but I will say that I don't have any regrets on my decision to migrate. Here's a screenshot to feast your eyes on the beautiful UI.
Installing WireGuard on OPNsense
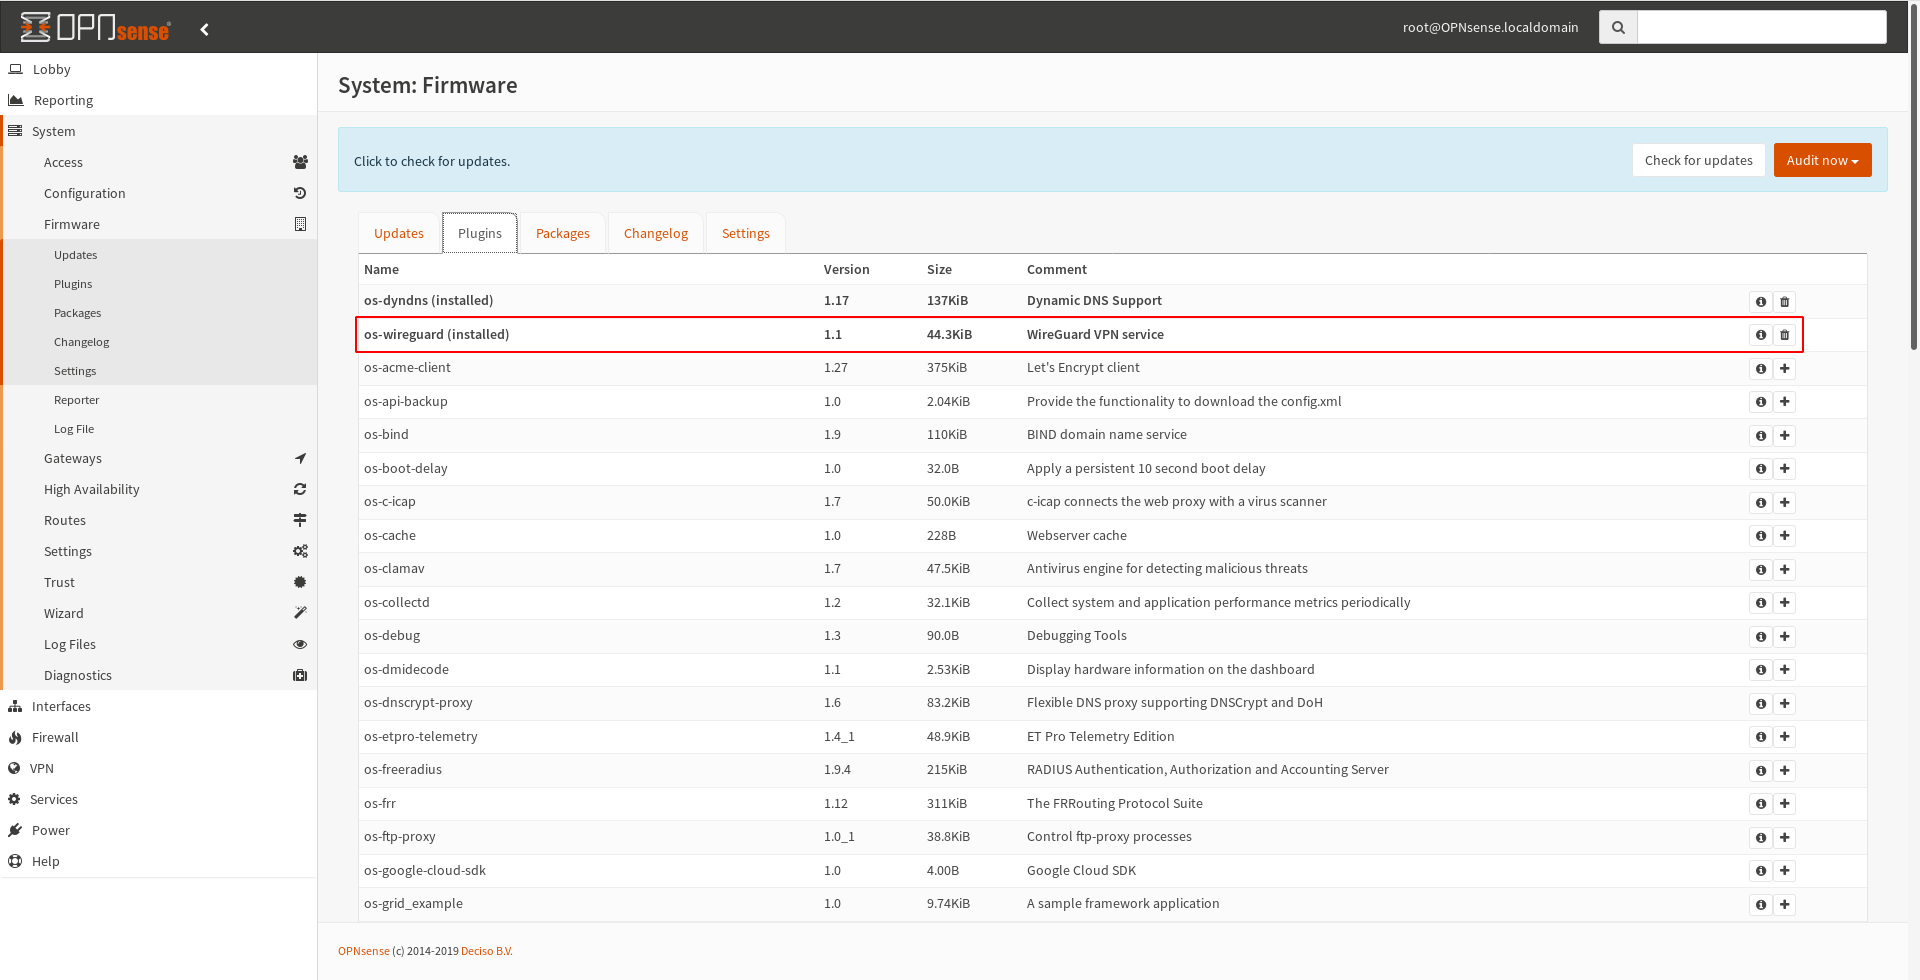
This was very straightforward, just go to System => Firmware => Plugins and click the + next to the os-wireguard in the Plugins tab.
Configuring WireGuard on OPNsense
Go to the newly installed VPN => WireGuard menu item (you may need to refresh your browser)
Add your local machine
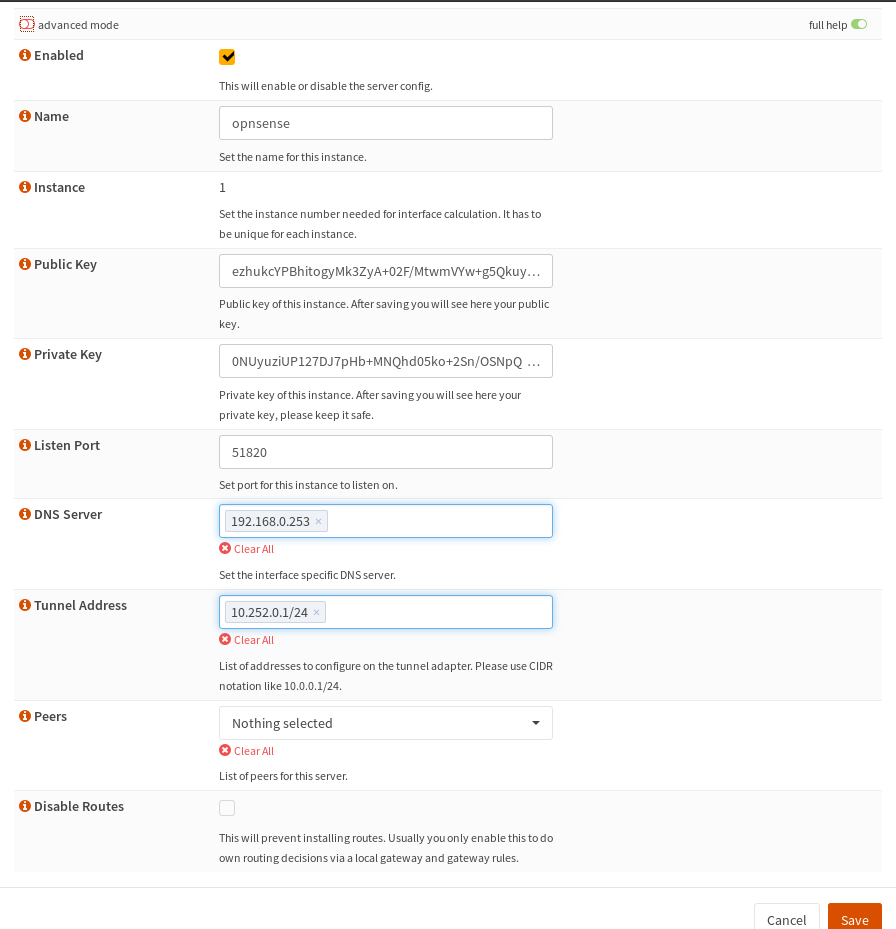
Select the Local tab and click + to add a new Local Configuration.
| SETTING | CONFIGURATION | EXPLANATION |
|---|---|---|
| Name | opnsense |
You can name this whatever you like |
| Public Key | Leave blank | Will be auto-generated |
| Private Key | Leave blank | Will be auto-generated |
| Listen Port | 51820 |
Default port for WireGuard, you could use any port |
| DNS Server | 192.168.0.253 |
I used my Adguard Pi IP address on my LAN |
| Tunnel Address | 10.252.0.0/24 |
IP address for the OPNsense WireGuard Tunnel |
| Peers | Leave blank | You'll select these later, after you've added peers |
| Disable Routes | Leave unchecked | You want routes to be allowed by your clients/peers |
Click save, and you'll find that if you go back and edit the config, your private and public keys will have been generated for you. As the picture below shows.
Add your peers
Select the Endpoints tab and click + to add a new Endpoint
| SETTING | CONFIGURATION | EXPLANATION |
|---|---|---|
| Enabled | Checked | Self explanatory |
| Name | phone |
You can name this whatever you like |
| Public Key | Leave blank | We'll fill this in later |
| Shared Secret | Leave blank | You can use Shared Secrets to make it more secure if desired |
| Allowed IPs | 10.252.0.2/32 |
IP address for the peer WireGuard Tunnel |
| Endpoint Address | Leave blank | Your phone/laptop is unlikely to have a fixed IP or domain name associated |
| Endpoint Port | 51820 |
Keep this the same as whatever port you used above |
| Keepalive | Leave blank | A WireGuard tunnel will drop if not used, setting 20 here would ping the tunnel every 20 seconds to keep it up, downside being battery life would be decreased, so I elected to leave it blank, the connection will be re-establised when needed anyway |
It should look like this, so click Save and you're good to go, just rinse and repeat for each client you want to add, just remembering to increment the Allowed IPs Tunnel each time, so the next client would be 10.252.0.3/24
You can see in the screenshot below I've already filled in my Public Key, more on that later.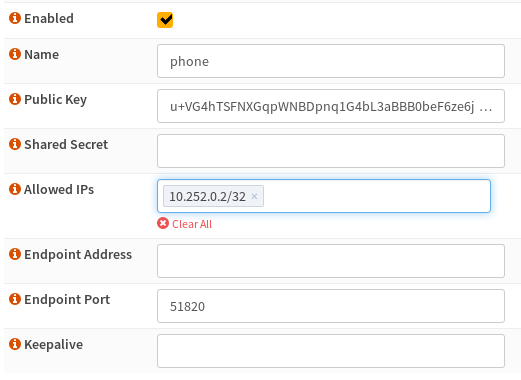
Select your peers
Now just go back to the Local tab and edit your config and select phone in the peers list.

Forward the WireGuard port
Firewall => NAT => Port Forward
We're now going to forward the 51820 port to the OPNSense machine allowing peers from WAN to access the WireGuard tunnel.
| SETTING | CONFIGURATION | EXPLANATION |
|---|---|---|
| Protocol | UDP | WireGuard is a UDP based protocol |
| Destination | WAN address | We're forwarding a port to WAN |
| Destination port range | Select other and enter 51820 |
Default WireGuard port |
| Redirect target IP | Enter the LAN IP address of your OPNsense install | We want the traffic to reach the WireGuard tunnel on OPNSense |
Add your WireGuard Interface
Final step on OPNsense, we need to go to Interfaces => Assignments add a new interface, selecting wg0 then edit it, I called it WG and don't forget to enable it.
As tempting as it may be to call it WireGuard, there is already an interface called that, which as I understand it from here is automatically created, and is a group for all the WireGuard tunnels you may create.
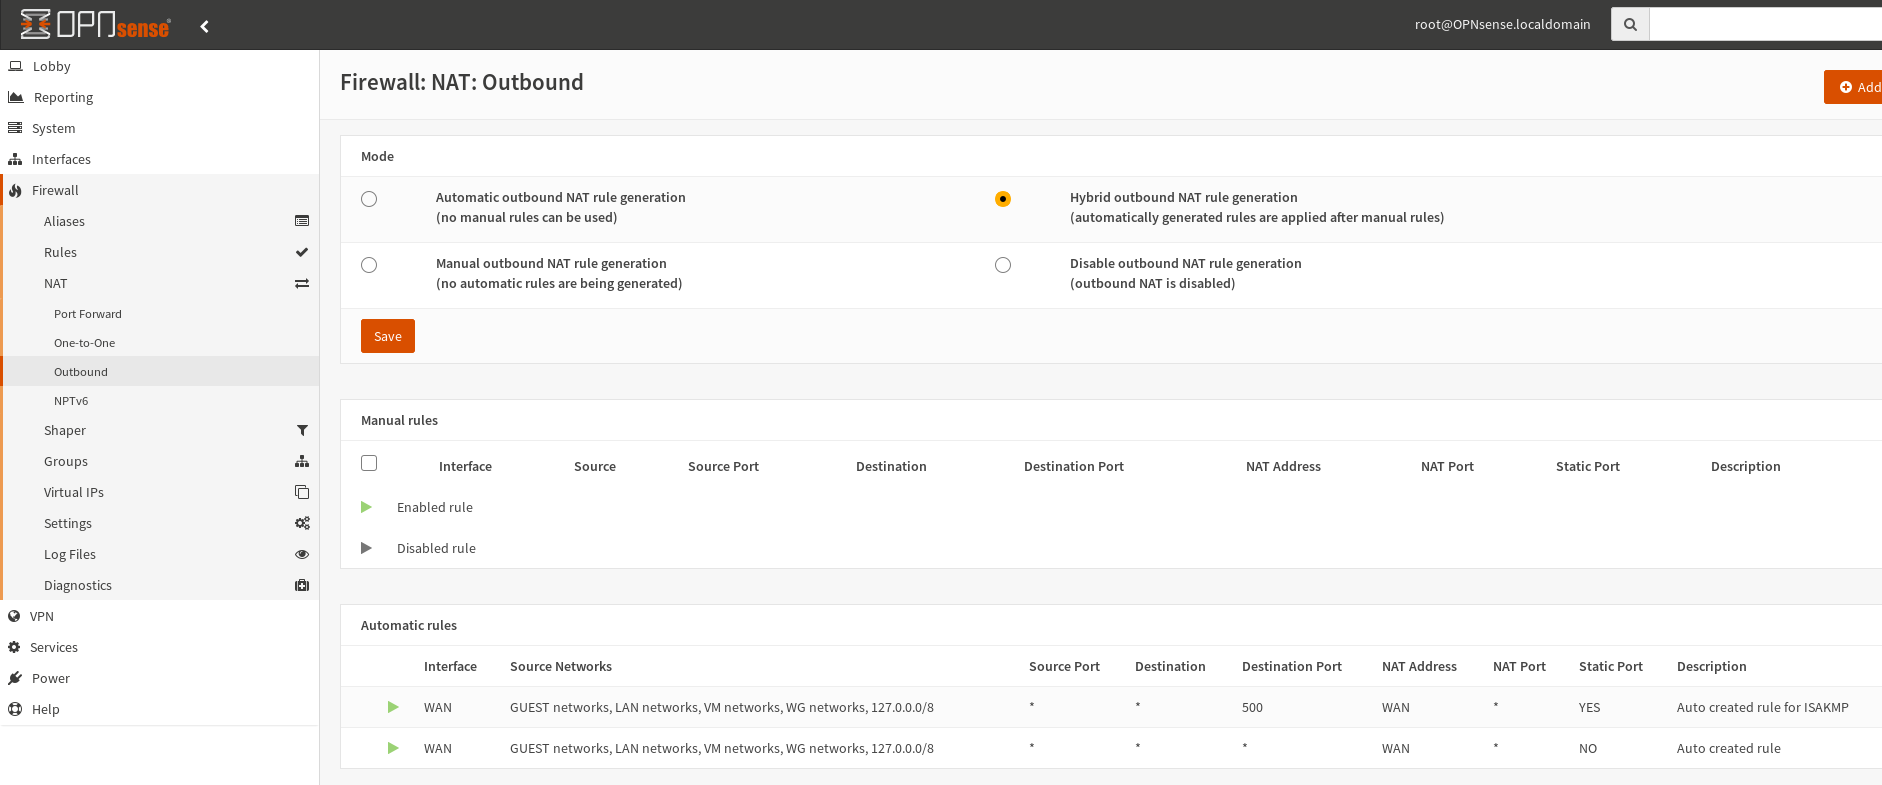
So go to Firewall => NAT => Outbound and ensure you're running either Automatic outbound NAT rule generation or Hybrid outbound NAT rule generation I then found I needed a reboot of OPNSense after which my WG network appeared in the list of Automatic rules.
Setting up your Android Device
There are a couple of options to install WireGuard on your Android device, the two I know about are the official WireGuard application and Viscerion.
For this tutorial I'm going to use the official application, although in practice, setting them up is identical.
Download and install the app from the playstore, and open it.
Add your WireGuard Interface
Then click the + icon and choose Create from scratch
| SETTING | CONFIGURATION | EXPLANATION |
|---|---|---|
| Name | opnsense |
You can name this whatever you like |
| Private key | Click Generate |
|
| Public key | derived from private key | |
| Addresses | 10.252.0.2/32 |
IP address for the phone's WireGuard Tunnel |
| Listen Port | 51820 |
Keep this the same as the port you used in OPNsense |
| DNS Servers | 192.168.0.253 |
Keep this the same as the DNS setting used in OPNsense |
| MTU | Leave blank | Is automatically taken care of |
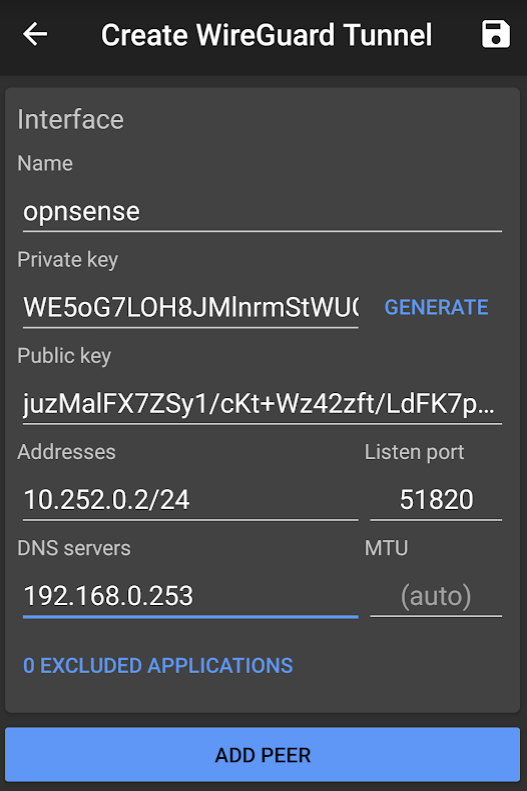
That's the WireGuard Interface added, so now click Add Peer to add your OPNsense peer
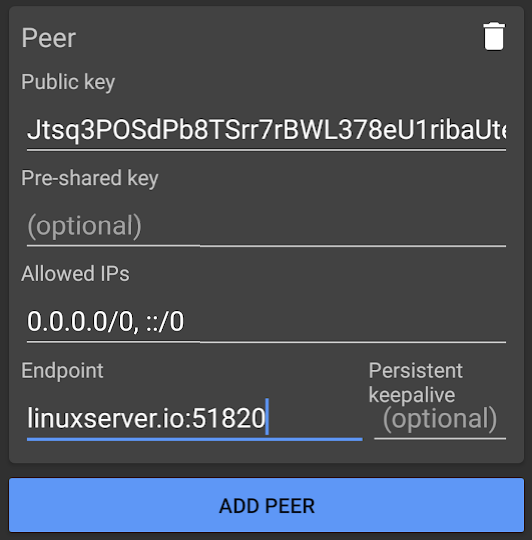
Add your OPNsense Peer
| SETTING | CONFIGURATION | EXPLANATION |
|---|---|---|
| Public key | Discussed below | |
| Pre-shared key | Leave blank | This is analogous to the Shared Secret parameter in OPNsense |
| Allowed IPs | 0.0.0.0/0, ::/0 |
Forward all IPV4 & IPV6 traffic to this peer |
| Exclude private IPs | Leave blank | Clicking this would exclude private IP ranges from the WireGuard tunnel |
| Enpoint | linuxserver.io:51820 |
You need a static endpoint to reach your OPNsense, either a domain name you have set up, or a static WAN IP |
| Persistent keepalive | Leave blank | A WireGuard tunnel will drop if not used, setting 20 here would ping the tunnel every 20 seconds to keep it up, downside being battery life would be decreased, so I elected to leave it blank, the connection will be re-establised when needed anyway |
Public Keys
This is the only fiddly bit, you need a way to get your OPNsense public key onto your phone, and your phone public key onto your OPNSense machine, I used a text file I placed on a SMB share on my LAN where I copy and pasted the information to. I'll leave it to your discretion on how you want to tackle this.
Once you've done that, you need to copy the OPNSense public key into the Peer setup on your phone, and the phone public key into the peer you created on your OPNsense install.
I have seen other WireGuard implementations, such as the excellent one on the current release candidate of Unraid which generates all of the private and public keys for both devices on Unraid and provides a QR code to easily add them to your peers, whilst this is very straightforward, technically, neither device should ever "see" the other peer's private key.
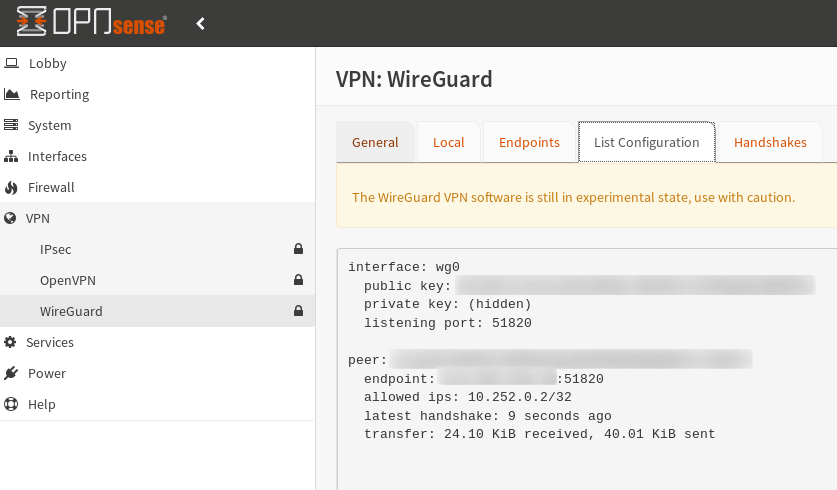
Connect!
Simply open the WireGuard app on your phone and click the toggle, you should find it connects, verify by looking at your OPNsense install.
Port 53
It is very often the case that public WiFi networks will block all ports other than 80:TCP 443:TCP & 53:UDP for HTTP, HTTPS and DNS respectively.
The effect of this is that if you were connected to one of these WiFi networks, you'd be unable to connect to your WireGuard VPN. To overcome this firewall issue simply run WireGuard on port 53, which is also UDP and therefore not able to be blocked.
Last step to allow internet access through wireguard vpn is to configure the below steps in the tutorial: